Learn from the Pros – Week 7
As the final four teams inch closer to their goal of playing for the Stanley Cup, the intensity level of games continues to rise. This week in our Learn from the Pros segment, we’ll take a look at a goal from the Western Confrence finals between the Hawks and Sharks. The goal we’re looking at comes from Chicago’s Dustin Byfuglin (#33) on a nice setup from Patrick Kane (#88).
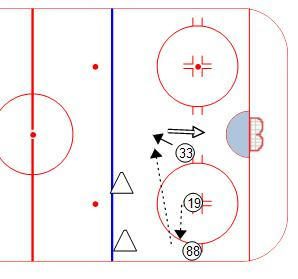
This goal is scored off a simple face-off play designed to exploit a “soft-area” in the offensive zone. Here’s a diagram of the play.

[0:03] – Chicago’s #19, Johnathan Towes wins the draw to the boar-side winger #88, Patrick Kane. Towes also follows the puck to the side of the ice creating a pick on the San Jose defender who should be covering Kane. Kane protects the puck with his body by turning up ice. #33 Dustin Byfuglin has crept up to the top of the circles in to a soft-area of the ice. When I refer to “soft-area”, I simply mean an area of the ice that is difficult to defend. The spot Byfuglin is in here is too high for most defensemen to want to cover, and too low for most wingers (who would be covering the point) to guard.
[0:04] – Byfuglin uses subtle body language to call for the pass from Kane. Kane has his head up and is able to identify the pass option. Byfuglin is skating backwards and has a wide and low stance allowing him to get plenty of power when the puck comes to him.
[0:05] – Although Byfuglin does not one-time this puck, he still has a very quick and powerful release. In one motion, he stops the puck, then winds up. Not one time did he stickhandle. This shooting skill should be practiced by every youth hockey player. This quick-release is often overlooked in practices. Too often in practices players are allowed to shoot in their ‘comfort-zone’ and take their time to set up the shot. Another angle of the shot can be found at the [0:36] marks of the video. Have your players practice this catch, set, shoot pattern – it will pay dividends in scoring!
It is also important to note here that San Jose’s #4 Rob Blake was slow to react to his coverage of Byfuglin. Since he was late to the coverage, when he steps out, he ends up creating a bit of a screen as Byfuglin releases his shot.
