Box Plus One – D-Zone Coverage
There have been a lot of questions popping up on the Message Board regarding defensive zone coverage. Coaches have several different options when deciding on a defensive zone coverage strategy/system. The “Box Plus One” system has become increasingly popular because of its ability to force the play to the outside of the ice. The primary purpose of any d-zone coverage is to minimize the number of opportunities from the “home base” area of the rink (see diagram below) and force the play into the “soft” areas of the ice. Soft areas are parts of the ice where far fewer goals are scored.
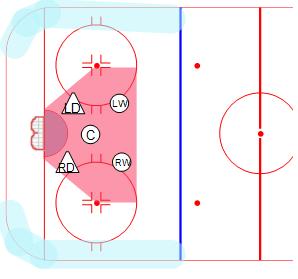
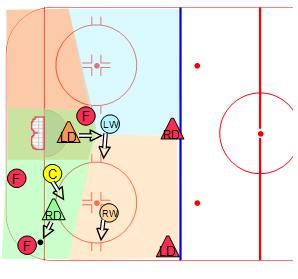
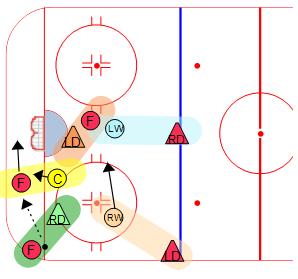
In order to effectively run the Box Plus One, coaches must have a good grasp of the area each player is responsible to cover. Starting with the puck in the corner, the diagram below shows basic areas of responsibility.
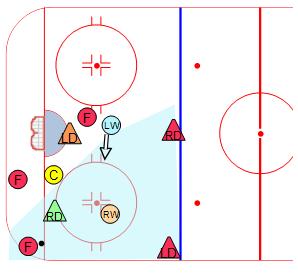
The LW is responsible for the general areas shown in light-blue. RW is responsible for areas shown in tan. RD is responsible for areas shown in light-green. LD is responsible for the areas shown in orange. Both LD and RD are jointly responsible for the area directly in front and behind the net. The C is jointly responsible (with LD and RD) to cover the entire area of both defensemen’s responsibility.
Along with the basic coverage areas shown in the diagram are arrows indicating which way the player’s feet should be facing during the play. Too often coaches leave this important concept out of their defensive zone instruction. The direction a player has his/her feet facing can be the difference between making a play and giving up a goal. As a rule-of-thumb, players in the defensive zone should not have their feet facing the net. The should be facing up ice, or no more than parallel to the goal line. This simple concept allows players to see and read the ice much easier, giving them a better chance of finding their responsibilities.
The diagrams below outline each player’s individual line of sight in the above scenario. Knowing where to look is crucial in properly executing the coverage.
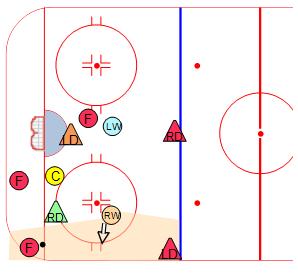
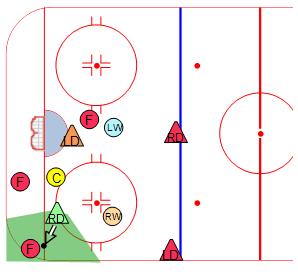
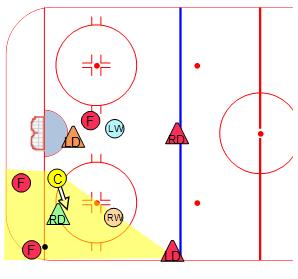
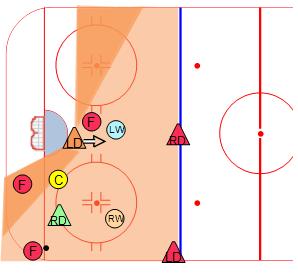
Note: The darker-orange areas in the Left D’s line of sight diagram represent areas LD must constantly be checking.
In order to more fully understand the coverage, a coach must understand the rotations and shifts in responsibility when the puck changes location. There are three main rotational scenarios.
Scenario #1 – Puck is passed to the point
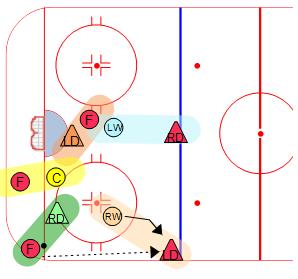
In this scenario, each player’s responsibility is highlighted.
RW should attack LD from the inside-out. This prevents LD from getting a better angle shot and also leaves fewer points of escape by utilizing the blue line and boards. RW should finish his/her check when pressuring the point.
LW is responsible for the RD, but should remain in the high-slot to help out with loose pucks or anyone who may be open. If RW pressures LD properly, the pass from LD to RD should not be an option.
RD and C are responsible for staying on the defensive side of their respective player. Defensive side simply means having your body between the player you’re defending and the net.
LD is responsible for tying up his/her man in front if a shot comes, as well as preventing the player from getting body position on any rebounds. LD should stay on the defensive side of the opponent at all times.
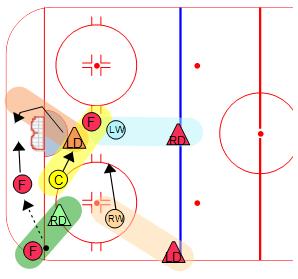
Scenario #2 – Puck is passed behind the net
Individual player responsibilities are again highlighted along with basic rotation directions.
C should pressure the new puck carrier. Ideally, C will be able to take the body and pin the puck carrier against the wall creating a turn over. C should try to force the puck carrier out to one side of the net and not allow cut-backs. Cut-backs often create coverage confusion and lead to scoring opportunities.
RD remains responsible for the previous puck carrier. It is crucial RD wins the race back to the front of the net and remains on d-side of his/her player.
LD remains responsible for the opposing player in front of the net. LD can not allow his/her feet to face the end-boards, as this will allow the opposing forward to get open in front of the net without LD knowing exactly where the opponent is skating. LD should keep his/her feet facing up ice until the puck carrier reaches the far post, at which point, LD can open facing the sideboards allowing clear vision of both the puck carrier and responsibility in front of the net.
LW remains in the high slot for additional support and remains responsible for the opposing RD.
RW shifts to the high slot for additional support. RW remains responsible for the opposing LD and should not turn his/her back to the coverage.
Alternate Rotation
An alternate to the scenario #2 rotation is to allow the LD to pressure the new puck carrier behind the net and have C fill LD’s previous responsibility in front of the net. This rotation can be useful when the puck carrier has a step or two on the C. In order for this rotation to work properly, C and LD need to communicate to ensure only one player is pressuring the puck. LD should not leave until C has picked up the man in front of the net. If LD leaves too early, the opposing forward will be left open in front of the net until C is able to pick him/her up.
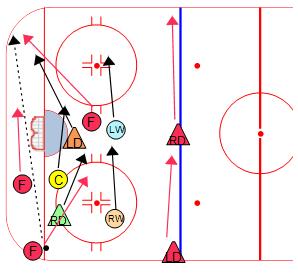
Scenario #3 – Puck is moved to the far corner
In scenarios where the puck shifts from one corner to the other, players must quickly and efficiently rotate to avoid any gaps in coverage.
LD becomes strong-side defenseman and should pressure the puck carrier assuming he/she is closer to the puck than C (as shown in this diagram).
C should rotate to the other side of the net for support – traveling through the front of the net to block passing lanes and cover anyone who may be in the high slot during the rotation.
RD returns to the front of the net. RD must win the race back to the front.
RW shifts into the high-slot for weak-side support.
LW rotates just above the dot on the far circle, staying in between RD and the net.
Final Tips:
1) Always keep your stick on the ice and in the most dangerous passing lane. This simple act can prevent countless scoring opportunities. The most dangerous passing lane is most often the middle of the ice.
2) Proper communication is key. In a game, there will be times of confusion. Proper communication amongst the players will allow responsibility shifts without creating gaps in coverage. Coverage gaps equal scoring opportunities!
3) Be aggressive on the puck carrier. The more time you give an opponent time to set up and make plays, the more likely it becomes someone will miss a coverage.
4) Centers should be treated like defensemen and be allowed to pursue the puck carrier in the corner if he/she can get there before a defenseman.
5) The first person pressuring the puck should look to take the body and separate the man from the puck. When separation has occurred, the support player (Center in the diagrams above) should quickly move in to gain possession of the puck.
6) Have your head on a swivel. In the defensive zone, players must consistently look around to identify gaps in coverage (open players). Players cannot get caught watching the puck and losing track of their responsibility.

Awesome description and diagrams for what I think is the best D coverage a team can use. Maybe when you get time can you do the same thing for the box +1 Center slot ( what I call it ). where the Centre covers the slot and the wingers support the dman in the corners to the nearest post. I like this system for quick breakout of of puck possesion. with the centerman performing a tight curl for the break out. Might be getting ahead of myself with this but hey if anyone can explain it you are the one. Awesome blog
Thanks,
Coach Rick Vaile
Great description of this D zone coverage. Could you explain the best ways to create scoring chances against this coverage. Thank you, Jon
Hi,
What if the offense is cycling the puck in the corner? I mean if the F with the puck tries to skate from the corner up to the point and makes a pass to the F behind the goal line using boards?
When guarding a cycling play, players need to stick with the man they have been defending. A cycle becomes effective when players chase the puck instead of maintaining their coverage.