2 on 1 Dissected (Part 1)
Every week I get several questions via email asking about different parts of the game. One topic that comes up very often is the 2 on 1 – how to defend it, different plays, passing vs. shooting, etc. Over the next few weeks, I will be breaking down various aspects of the 2 on 1 rush. In this first post, I will focus on a simple play for when you think you’re out of options offensively.
2 on 1’s are one of the most exciting & coveted scoring opportunities in the game. When a 2 on 1 occurs, coverage has been blown somewhere, or someone has gotten beat. This situation presents itself with several very unique situations both offensively and defensively. It is one of the most challenging plays to defend against skilled forwards.
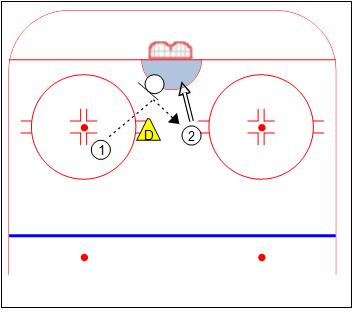
Let’s start with the classic version of the 2 on 1 rush. Picture two forwards roughly as wide as the hash marks, with one defender playing in the middle of the ice. As the forwards get closer to the net, the natural tendency is to converge on the net. This makes sense because the shooting angle gets better as we get in closer to the middle of the ice. Most times, weak-side forwards are taught to “crash the net”. This typically entails driving to the far post with his/her stick on the ice. Here’s a diagram so we’re all on the same page:
As the forward gets closer to the net, he/she has several things to analyze:
1) Is the goalie cheating to the pass?
2) Is there a passing lane for the backdoor play?
3) Is the goalie leaving big holes to shoot at?
4) Is the defender going to take me, my partner, or stay in the middle?
Often times the puck-carrying forward will find him/herself running out of time and space as all 3 players converge on the goaltender. In this classic 2 on 1 formation, if the defenseman stays in the passing lane, he/she is essentially forcing the puck carrier to shoot the puck. When the strong-side forward shoots the puck, this is implying two things:
1) the goaltender takes the shooter
2) the defenseman takes away the passing option (F2 in the above diagram)
Note: I will get into defensive theories for 2 on 1’s in a later post – but for now, let’s assume this is how the defenseman is playing the rush.
Now that we’ve decided the puck carrier is going to shoot, it’s necessary to discuss the right and wrong way to approach a shot. If F1 in the diagram above is a right-handed shot, he/she will have the illusion of having more net to shoot at short-side than is really there (assuming the goalie is playing his/her angles correctly). This is caused by the puck being on the inside of the ice, and the goalie lining up on the puck, not the shooter’s body. The reverse illusion may appear for a left-handed shot in the same scenario, with more space appearing to be visible on the far-side. Shooters need to be aware of this illusion, as a missed short-side or far-side shot almost always ends the rush as quickly as it started.
There are legitimate times when a goaltender is giving you space to shoot…this can come from bad angling, poor stance, lack of confidence, etc. If you have a good scoring opportunity, by all means, don’t pass that up – try to hit it! However, if you find yourself without anywhere to go, and no good scoring option, there is still one GREAT option left. Shoot for a rebound!
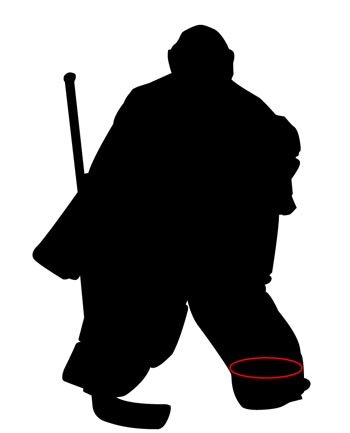
Many youth players never think of shooting the puck to do anything other than scoring. This mindset needs to be altered. If F1 has no big holes to shoot for on the 2 on 1 rush and cannot get a clean pass over to F2, his/her mindset needs to shift on how to get F2 the puck to stuff it in the open net. If the goalie is squared up correctly, a shot off the goalie’s left (shooter’s right) leg pad – if done correctly – will lead to a rebound right in the middle of the ice. The placement of the shot is critical to increase the likelihood of the rebound going where you want it. Shooting too far to the left (closer to the 5-hole) can cause the puck to die in front of the goalie – giving the goaltender a better chance of controlling and freezing the rebound. The height of the shot is also critical. The shot needs to be just above the foot cover and below the knee in order for the rebound to sit in the middle of the rink (see the goaltender illustration below).
If executed correctly, F2 should have a tap-in goal to the empty net. This is a good play to practice, as it teaches players to go hard to the net with their sticks on the ice as well as stopping at the goal line on a rush.
In the upcoming 2 on 1 segments, I will discuss playing a 2 on 1 defensively and offensive creativity. As always, feel free to send your comments and thoughts to me via email at kevin [ at ] hockeyshare [ dot ] com
Skate hard & keep your head up! See you around the rinks.


Never though of that. Thanks will sure try it in practice.