
2-1-2 Forecheck
Forechecking efficiently is a must for any successful team today. Without an organized structure for attacking and regaining control of the puck, the team is vulnerable to quick breakouts, and will assuredly not be in proper position to play defense when the other team begins heading up ice.
Before getting into the specifics of the 2-1-2 forecheck system, it is important to understand what type of play a forecheck is exactly. Many coaches believe the act of forechecking is an offensive tactic. I don’t believe this is an accurate description. While the forechecking described here outlines the pressure in the offensive zone, the key lies in the possession of the puck. I believe there are only three distinct scenarios regarding possession: 1) offense, 2) defense, 3) transition. In order for a player to be on “offense”, his/her team MUST have control of the puck. If the team does not have control of the puck, they are either in the transition phase or defense stage. The transition stage occurs during turn-overs while players shift from defense mode to offense mode (or vice-versa). A good rule of thumb is: if you don’t have possession of the puck, you’re playing defense.
An offensive zone forechecking system is a defensive tactic to regain control of the puck. A well executed forechecking system will allow players to make quick transitions from defense to offense to create scoring opportunities. Most often an offensive zone forecheck will occur when the puck is dumped in. With that understanding of how to approach the pressure, let’s take a look at the 2-1-2.
The 2-1-2 is an aggressive-style forechecking system designed to place pressure on the puck carrier. Its name comes from the pressure-style being used where the first two players aggressively pursue the puck, one player stays slightly higher for middle support, and the defense hold their regular positions on the blue line. Here is a diagram of a basic 2-1-2 setup:
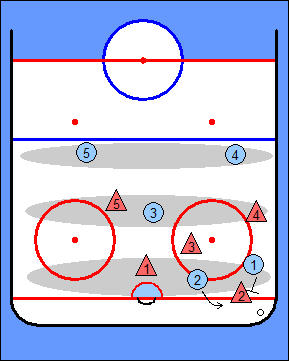
In this basic scenario, players 1 & 2 (in blue) are the first two to the puck, player 3 remains in the middle high-slot, and the defense (players 4 & 5) play their typical point positions. Below is an outline of the each forechecking player’s responsibility:
Player 1: The first player on the puck carrier should take the body (age permitting) to create a separation of the puck and the defending player. This player must have an active stick and actively take away passing lanes while pursuing the puck carrier.
Player 2: The second player should ensure there is no D-to-D pass option for the puck carrier. Once player 1 has successfully taken the body and separated the defending player from the puck, player 2 should look to pick up the loose puck.
Note: Player 1 can also share responsibility in eliminating the D-to-D outlet pass option depending on where he/she is coming from on the ice. With a 2-1-2 forecheck, the idea is to force the play to one side of the ice and not allow puck movement to the weak-side.
Player 3: Player 3 plays a read-and-support role, staying in the middle of the ice in the high-slot. If defensive player 2 is able to make a pass to defensive player 4, player 3 would pressure player 4 to create a turn-over. If the puck is broken out, player 3 is in good position to backcheck.
Players 4 & 5: The defensemen should play the point play as normal, reading the play as the defending player controls the puck and attacking players are attempting to force the play to one side of the ice.
The 2-1-2 system is great to run when the opposing team has defensemen who are confident in skating the puck up the ice. Applying this type of pressure will take away their time and space to handle the puck. It also works well when opposing teams have slow defenders. Slow defensemen can be exploited by applying aggressive pressure. It is critical to have the first two players keep their feet moving through the entire process. When forecheckers hesitate using a 2-1-2, a good defense pair on the opposing team will use the extra second or two to find an outlet pass – usually D-to-D. Skate hard all the way through the forecheck.
This article outlines one way to apply pressure, there are countless minor differences between implementations. Below are some animations to show examples of ways to apply this forecheck and rotations if the other team completes a breakout pass.


One Reply to “2-1-2 Forecheck”